Wednesday, November 28, 2007

Healthy Enchilada Casserole, in the Crockpot


Now that I have found my way back to the gym and seem to have mountains of correcting to do every night, making dinner is sometimes a hassle. If I’m not making something creative or interesting, I am not excited about cooking at all. I definitely have a love-hate relationship with cooking. If I’m making plain old chicken breasts and broccoli, I loathe the task, but if I can try a new recipe, or get my creative juices flowing and come up with some fantastic creation, then I care to be no where else but the kitchen.

Anyway, as I was saying…putting something creative, delicious, healthful, and easy onto the table on weeknights sometimes seems like an impossible feat. I’ve been thinking of breaking out my yet-to-be-used Crockpot and let it do all the work one or two nights a week, but even still, many of the recipes I am finding don’t allow me to set it in the morning when I leave (at 6am) and have it ready when I return home at 6pm. I think my Crockpot might have a timer, but I haven’t had the time to read through the book and figure it out. I’m waiting for a rainy day! Anywho, I was able to find this recipe for an Enchilada Casserole from cookinglight, and since my husband works close to home, he was able to stop home in the middle of his day and start this baby up.

I didn’t alter the recipe much, except for adding slightly more enchilada sauce (Trader Joe’s) and perhaps throwing slightly more cheese in there. Actually, that is a lie; I DEFINITELY threw more cheese in than called for. It was low fat though, so I didn’t feel too bad about it. I added some cheese in before I added the corn muffin/bread mixture, that way there was some cheesy goodness running through the casserole, and not just on top.

My husband, Matt, often gets nervous at my attempts at meat-free meals, but this one left him quite satisfied, and I actually think I am slowly convincing him that every meal does not have to contain chicken, beef, pork, etc. Success!

Friday, November 23, 2007

Nana's Apple Pie - Perfection!!!!!!


I was thrilled for Thanksgiving for a number of reasons, but one of them was certainly for the opportunity to make my grandmother’s apple pie. THIS IS HANDS-DOWN THE MOST PERFECT AND DELICIOUS APPLE PIE YOU WILL EVER TASTE! Now, I am the only one in the family who can duplicate the taste of my nana’s creation. My mom burns the crust. My Aunt Patti never gets the spices quite right. My Aunt Maureen’s crust is much too dry. My cousin Kerri produces a pie with far too mushy apples. For whatever reason, I have the special touch. My only downfall, typically, is not quite mastering the art of rolling out the crust. Mine never quite fits, and I end up having to patch, resulting in a less aesthetically pleasing pie. This year, though, I found my solution. I one and a halved the recipe for the dough, allowing me some wiggle room in terms of filling out the pie plate. I was a tad worried that the crust might be slightly thicker, and in turn, not cook properly, but turns out, it was just fine! The recipe below is not increased, but rather the original, sacred ingredients and measurements. Depending on your level of expertise with crust rolling, you may want to increase the amounts.

Preheat oven at 350 degrees and very, very lightly grease a pie plate. (The recipe does not call for greasing the pie plate, but I always do, just to be safe).

9-10 apples, cored, sliced, and peeled (you may need more, eyeball it)
1 ½ cups flour
½ tsp. salt
2/3 cup shortening
¼ cup water
¼ cup sugar
¼ tsp. nutmeg
¼ tsp. salt
¼ tsp. cinnamon
With 2 knives (or a pastry blender/”chopper”), crisscross chop the flour, salt, and shortening.
With a fork, mix and add the water.
Then, with hands form into a ball.
Break in half and form two balls.
Place saran wrap on counter, toss with flour, and roll out.
Place bottom in pie plate and sprinkle with a little flour.
Add the apples.
Mix in bowl – sugar, nutmeg, salt, & cinnamon.
Pour mixture over the top of the apples and shake a little more nutmeg & cinnamon on top.
Put dobs of butter on top of the apple mixture.
Roll out top crust and place on top.
Dab crust with milk.
Put slits in top of crust.
Bake for 40-45 minutes until crust is a pale, flaky consistency.

I’ve used both McIntosh and Cortland apples, and although I prefer McIntosh, it comes out fine with both. Sometimes I even use a combo of the two. I like to serve with vanilla ice cream, but whip cream makes a nice topping as well. And, of course, it is best served warm

Cara's Pumpkin Spice Cheesecake Brownies - YUM!


As another Thanksgiving dessert, I gave Cara's brownies (click for recipe) a try...and boy am I glad I did! And, I must say, that my husband's family was glad I tried this recipe as well! So, I owe a BIG thank you to Cara for her creative genius in the kitchen! What a wonderfuly, fudgey, spicy combination this was! I doubled the recipe, and was left with more than enough! The only thing I might do differently next time is add a little more of the cheesecake mixture. I wish I still had some of these lying around, so yummy!!!!

Thursday, November 1, 2007

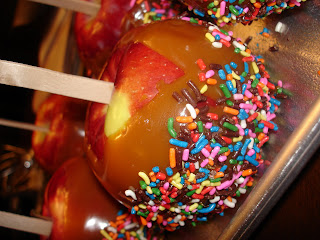
Caramel Apples


I wanted to bring in a treat for my homeroom students (I teach 7th grade), but I didn't want it to be candy...I figured they would get enough of that. So, I decided to make caramel apples as a nice alternative to the pounds of candy they will most likely consume.

I started with 3 packages of caramel squares. I heated over a double boil with a little milk. I didn't measure the milk, I just added a little bit at a time until it was the right consistency. Once mixed, I kept on the heat (low heat) and stuck craft sticks into all of my apples. My apples had been refrigereatd, which I was a tip I read online last week.

I dipped the apples in the caramel, and then I rolled them through a plate of rainbow sprinkles (or, where I come from, jimmies!). I placed the apples on a greased (with Pam) baking sheet in the fridge to set. Later that night, I wrapped them with wax paper and tied with an orange ribbon.

The apples were such a hit yesterday, I was the coolest teacher at school...for a day!!

Bandit, aka SHREK!


This is a picture of our next door neighbor's dog, Bandit. Sarah dressed him up as Shrek for Halloween, and it was hysterical!!!!!!