Monday, December 17, 2007

Chocolate, Dried Cherries, and Pecan Bark


I saw this fabulous bark creation on Emeril Live last week, but could not for the life of me find the recipe when I searched by episodes that aired last week, so I decided to create my own. Know that Emeril served as my inspiration, although I ad-libed in terms of how I concocted this delicious treat! But, bark itself is such a simple concept, you could really whip it up on a whim any time!

I started with caramelizing some pecans. I chopped pecans and added them to a mixture of melted butter and brown sugar. I used about 3 cups of pecans, half a stick of butter, and about 3/4 cups of brown sugar. I let the pecans coat thoroughly in the saute pan, and then transferred them to a parchment lined baking sheet where I baked at 350 for about 10-12 minutes. I let them cool for a few hours, sprinkled some cinnamon, nutmeg, and cloves over them, and then crumbled/separated the pieces a little bit.

Once the pecans were cool, I used a double boil to melt white chocolate and semi-sweet chocolate (in 2 separate bowls of course). I used chips, for convenience, but of course you could also use chopped bars/squares. Once melted, I added a dab of butter to the mixtures for sheen (I remember Emeril doing that). I then poured the chocolates onto the parchment paper, and marbled them together. On top, I added the pecans and then chopped dried cherries. I worked the pecans/cherries into the chocolate mixture a little, but wanted them to stay mostly on the top. I then set the baking sheet in the fridge to cool. The next day I slammed the creation on the counter to break up, placed on decorative plates, covered in cellophane, and set them aside as gifts for my para-professionals at work.

I actually made 2 batches, one which I put together exactly as described above, and the other where I scattered the nuts and cherries on the bottom and poured, and then marbled, the chocolate on top...resulting in a more even distribution of the goodies. Both came out great and equally tasty!

(Here is a picture of the underside of the bark):

Thursday, December 13, 2007

Sugar Cookies


I made sugar cookies tonight for one of my classes. I teach 7th grade English and have 5 classes of about 22 students each. We are currently reading A Christmas Carol by Charles Dickens, and among other things, studying figurative language. Each class collaborated to create an image of the Ghost of Christmas Past according to the detailed description in the novel. I took pictures of each creation, had my team of teachers vote, and decided to reward the winning class with cookies! I decided to shape the cookies into a C because that is the class that won (our classes are labeled A, B, C, D, E). I told the kids they could look at the plate of treats to determine if they were the winners. The students didn't understand how they would be able to tell until they say that the cookies were shaped as the letter C. They went nuts. They also enjoyed the taste of the cookies, I think, although I found them a little dry.

I used this recipe from the Food Network, but added a few dashes of cinnamon to the batter. Like I said, it was a bit dry, but perhaps that was because I rolled them a little thinner than perhaps I should have. I decorated with some with an assortment of Christmas sprinkles, some with cinnamon and sugar, and some with rainbow sprinkles.

Sunday, December 9, 2007

Anniversary Cake!!!!


Matt and I had the most delicious wedding cake EVER! Really. We did. Gretchen Ellison from Enchanted Wedding Cakes created our wedding cake, seen below. We loved the look and taste of it. It was phenomenal!

Instead of freezing the top layer, Gretchen gave us the option of a fresh mini-cake for our anniversary...we went the fresh route as we wanted to ensure deliciousness on our anniversary! She did not disappoint. Although there was only one layer of filling instead of a triple layer, it was still fabulous. We had alternate flavors on different tiers of our original cake, raspberry lemon torte and strawberry Grand Marnier. For our anniversary cake, we received the raspberry lemon flavor. It was SO GOOD!

Anniversary Breakfast!


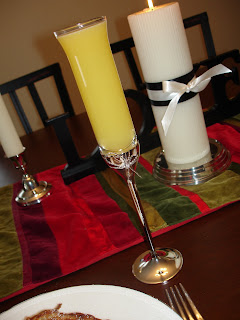
Today was our 1st wedding anniversary! Yay us! We had a lovely dinner out on Saturday night, and actually had a gourmet dinner service come in and cook for us on Sunday, our actual anniversary. Sunday morning, though, we made breakfast together and enjoyed cinnamon french toast and mimosas. I used the unity candles from our wedding ceremony as a centerpiece for breakfast, as well as a "LOVE" sign that was on the guestbook table at the reception. I also used the toasting flutes from our wedding for the mimosas. Yes, I am the epitome of a sentimental SAP!

I don't have an exact recipe for the french toast, but here is the basic idea...

We sliced some amazing cinnamon swirl bread nice and thick. The secret to a good batch of french toast, I believe, is the thickness of the bread, which is why I like to use a loaf I can slice myself. This loaf was purchased at a hole in the wall country store in Waterville, NH while we were enjoying a fall weekend away. It had been sitting in the freezer waiting for the right morning to make an appearance. We beat 2 or 3 eggs with a little skim milk and a pinch of nutmeg and a little cinnamon together, dipped the bread in the egg mixture, let it saturate, and placed on the griddle. Once done, I served with powdered sugar and cinnamon sticks for garnish, and pure maple syrup for pure taste!

Monday, December 3, 2007

Oh Christmas Tree!


I was lucky enough to have my first snow day of the year on Monday (yes, teachers get JUST as excited about the first snow!), so it seemed like a perfect day to decorate our Christmas tree; the one we had searched for and cut down on the coldest day of the year thus far! We went to a local tree farm on Saturday, and aside from the cold, aside from my nephew hysterically crying, and aside from the fact that their tree selection was pretty poor, we had a great time! The cold certainly didn't chill our spirits!

In order to get into the festive mood, I played some holiday music and made these delicious egg nog cocktails. No exact recipe here, but here is what I did. I put some ice in a shaker. I then combined rum (or you could use whiskey, or perhaps even kaluha?) with a good amount of egg nog (I used the light version, didn't want to feel too guilty about it) and a little cinnamon. Shake the heck out of it, and pour over crushed ice in a martini glass. My favorite part was the cinnamon sugar rim I added before placing the ice and then drink in the glass. I finished off the cocktail with a sprinkling of nutmeg. Cheers!

Wednesday, November 28, 2007

Healthy Enchilada Casserole, in the Crockpot


Now that I have found my way back to the gym and seem to have mountains of correcting to do every night, making dinner is sometimes a hassle. If I’m not making something creative or interesting, I am not excited about cooking at all. I definitely have a love-hate relationship with cooking. If I’m making plain old chicken breasts and broccoli, I loathe the task, but if I can try a new recipe, or get my creative juices flowing and come up with some fantastic creation, then I care to be no where else but the kitchen.

Anyway, as I was saying…putting something creative, delicious, healthful, and easy onto the table on weeknights sometimes seems like an impossible feat. I’ve been thinking of breaking out my yet-to-be-used Crockpot and let it do all the work one or two nights a week, but even still, many of the recipes I am finding don’t allow me to set it in the morning when I leave (at 6am) and have it ready when I return home at 6pm. I think my Crockpot might have a timer, but I haven’t had the time to read through the book and figure it out. I’m waiting for a rainy day! Anywho, I was able to find this recipe for an Enchilada Casserole from cookinglight, and since my husband works close to home, he was able to stop home in the middle of his day and start this baby up.

I didn’t alter the recipe much, except for adding slightly more enchilada sauce (Trader Joe’s) and perhaps throwing slightly more cheese in there. Actually, that is a lie; I DEFINITELY threw more cheese in than called for. It was low fat though, so I didn’t feel too bad about it. I added some cheese in before I added the corn muffin/bread mixture, that way there was some cheesy goodness running through the casserole, and not just on top.

My husband, Matt, often gets nervous at my attempts at meat-free meals, but this one left him quite satisfied, and I actually think I am slowly convincing him that every meal does not have to contain chicken, beef, pork, etc. Success!

Friday, November 23, 2007

Nana's Apple Pie - Perfection!!!!!!


I was thrilled for Thanksgiving for a number of reasons, but one of them was certainly for the opportunity to make my grandmother’s apple pie. THIS IS HANDS-DOWN THE MOST PERFECT AND DELICIOUS APPLE PIE YOU WILL EVER TASTE! Now, I am the only one in the family who can duplicate the taste of my nana’s creation. My mom burns the crust. My Aunt Patti never gets the spices quite right. My Aunt Maureen’s crust is much too dry. My cousin Kerri produces a pie with far too mushy apples. For whatever reason, I have the special touch. My only downfall, typically, is not quite mastering the art of rolling out the crust. Mine never quite fits, and I end up having to patch, resulting in a less aesthetically pleasing pie. This year, though, I found my solution. I one and a halved the recipe for the dough, allowing me some wiggle room in terms of filling out the pie plate. I was a tad worried that the crust might be slightly thicker, and in turn, not cook properly, but turns out, it was just fine! The recipe below is not increased, but rather the original, sacred ingredients and measurements. Depending on your level of expertise with crust rolling, you may want to increase the amounts.

Preheat oven at 350 degrees and very, very lightly grease a pie plate. (The recipe does not call for greasing the pie plate, but I always do, just to be safe).

9-10 apples, cored, sliced, and peeled (you may need more, eyeball it)
1 ½ cups flour
½ tsp. salt
2/3 cup shortening
¼ cup water
¼ cup sugar
¼ tsp. nutmeg
¼ tsp. salt
¼ tsp. cinnamon
With 2 knives (or a pastry blender/”chopper”), crisscross chop the flour, salt, and shortening.
With a fork, mix and add the water.
Then, with hands form into a ball.
Break in half and form two balls.
Place saran wrap on counter, toss with flour, and roll out.
Place bottom in pie plate and sprinkle with a little flour.
Add the apples.
Mix in bowl – sugar, nutmeg, salt, & cinnamon.
Pour mixture over the top of the apples and shake a little more nutmeg & cinnamon on top.
Put dobs of butter on top of the apple mixture.
Roll out top crust and place on top.
Dab crust with milk.
Put slits in top of crust.
Bake for 40-45 minutes until crust is a pale, flaky consistency.

I’ve used both McIntosh and Cortland apples, and although I prefer McIntosh, it comes out fine with both. Sometimes I even use a combo of the two. I like to serve with vanilla ice cream, but whip cream makes a nice topping as well. And, of course, it is best served warm

Cara's Pumpkin Spice Cheesecake Brownies - YUM!


As another Thanksgiving dessert, I gave Cara's brownies (click for recipe) a try...and boy am I glad I did! And, I must say, that my husband's family was glad I tried this recipe as well! So, I owe a BIG thank you to Cara for her creative genius in the kitchen! What a wonderfuly, fudgey, spicy combination this was! I doubled the recipe, and was left with more than enough! The only thing I might do differently next time is add a little more of the cheesecake mixture. I wish I still had some of these lying around, so yummy!!!!

Thursday, November 1, 2007

Caramel Apples


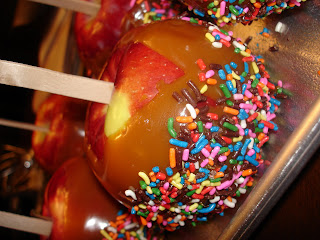
I wanted to bring in a treat for my homeroom students (I teach 7th grade), but I didn't want it to be candy...I figured they would get enough of that. So, I decided to make caramel apples as a nice alternative to the pounds of candy they will most likely consume.

I started with 3 packages of caramel squares. I heated over a double boil with a little milk. I didn't measure the milk, I just added a little bit at a time until it was the right consistency. Once mixed, I kept on the heat (low heat) and stuck craft sticks into all of my apples. My apples had been refrigereatd, which I was a tip I read online last week.

I dipped the apples in the caramel, and then I rolled them through a plate of rainbow sprinkles (or, where I come from, jimmies!). I placed the apples on a greased (with Pam) baking sheet in the fridge to set. Later that night, I wrapped them with wax paper and tied with an orange ribbon.

The apples were such a hit yesterday, I was the coolest teacher at school...for a day!!

Bandit, aka SHREK!


This is a picture of our next door neighbor's dog, Bandit. Sarah dressed him up as Shrek for Halloween, and it was hysterical!!!!!!

Tuesday, October 30, 2007

Pork Chops with Cranberry-Thyme Pan Sauce


This recipe was AWESOME! I loved it! Matt and I felt the need to change things up, and boneless pork chops seemed the way to go. But, I wasn't sure what I was going to do with them...until I came across this epicurious recipe. I followed the recipe nearly exactly, although I did make a few adjustments, which I listed below:

* pork took longer to cook, because I some HUGE boneless chops!
* I used more wine and more cranberry sauce
* I used shallots instead of green onions

The pork came out perfectly and the sauce was amazingly delicious! I served this with cinnamon nutmeg apple slices and a mixed green salad.

For the apples, I sliced and peeled 2 medium sized apples. I placed in a small pot and added a touch of water. I simmered until softened, and added cinnamon and nutmeg as they cooked. I placed the apples on top of the pork, after I had spooned on the sauce.

For the salad, I tossed mixed greens with crumbled turkey bacon, toasted walnuts, dried cranberries, and honey goat cheese. For the dressing, I combined a few tablespoons of cider vinegar, some apple cider, a tiny bit of honey, shallots, and some salt and pepper. I streamed in extra virgin olive oil, and voila!

Matt hates goat cheese, so I omitted it on his salad, and cooked up some brown rice for him as well, as he feared the meat and salad would not be enough.

Sunday, October 28, 2007

More Pumpkin Whoopie Pies


Last time I made these, they weren't "pretty" so I tried to disguise them in my pictures by shooting from different angles and in not so great lighting. Here are some pics from round 2, and they came out much better looking, and still great tasting! Still not 100% in terms of the perfect whoppie pie look, but getting closer.

Also, this time I used the filling recipe from the recipe I posted last time, link here. It was a much better consistency to hold the pies together, but it was a little too sweet. I doubled the recipe to make 8 whoopie pies, and next time I would cut back on the sugar.

Friday, October 26, 2007

Steak & Cheese Sandwiches with Sweet Potato Chips


My husband looooves steak and cheese sandwiches, and I don't mind them either! But, we both know they are something we shouldn't really eat. I decided it might be a good idea to make them at home, that way I can control the ingredients and try to make it somewhat healthier. Here's what I did...

I browned one package of extra lean shaved steak over medium heat, adding salt and pepper as it cooked. I also sauteed sliced green peppers and white onions until soft. I prepared multigrain rolls by slicing across nearly all the way through.

Meanwhile,I began working on the sweet potato chips. I was going to make sweet potato fries, but once I came across this simple recipe in my Martha Stewart Living catalog, I couldn't resit. I sliced 2 sweet potatoes using my mandoline. Once sliced, I placed on two greased (with olive oil spray) baking sheets. I drizzled with the sliced potatoes with a little extra virgin olive oil, and then sprinkled with fresh black pepper, sea salt flakes, and dried rosemary. I baked for 25 minutes at 400 degrees. FYI - I switched the baking sheets to alternate racks half way through the baking, and it seemed to work well.

One the steak and veggies were cooked, I assembled the sandwiches. I placed the peppers and onions on the steak and topped with low fat cheese, and placed under the broiler to melt. I served along with the chips. Pretty tasty! And, while this meal is far from healthy, it is at least a better alternative than a sandwich from a sub shop!

Monday, October 22, 2007

Matt Makes Dinner

Earlier this afternoon, my husband called me to tell me he wanted to make dinner. I was all for it! He was planning to pick up some steak. Perfect! We hadn't had red meat in quite some time, so I was looking forward to a nice, juicy steak, and also a night off from scrubbing pots and pans and the like.

He did a nice job, after all, he is certainly not a gourmet. But, then again, neither am I. He chose a Delmonico steak (wouldn't have been my choice, too fatty, but it was good nonetheless), brown rice (he even cooked it in beef broth), and canned green beans (eehh, whatever).

Now, he only got one steak, but it was a HUGE, monsterous slab of beef! So, he asked me how much I wanted, and I replied with something like "well, not as much as you." He took that and ran with it, as you can see in the portion sizes below!!!

HIS:

MINE:


Oh how I love him! My silly, silly husband!

Tuesday, October 16, 2007

Pumpkin Whoopie Pies


Last weekend I had the pleasure of having a pumpkin whoopie pie. I thought about that whoopie pie ALL WEEK LONG, and couldn’t wait to try and recreate the delectable treat myself! I searched for the perfect recipe, and settled on this recipe from allrecipes.com. I really didn’t make any changes, except for the filling. In terms of the actual batter, I don’t think I would change anything…they turned out great. I did use pancake/egg rings to get the exact, circular shape that I wanted, and that worked out really well. In the picture on the allrecipes website, it looks as though you could also spiral the batter onto a baking sheet using a pastry bag.

Because I wanted a lighter and not so sweet filling, I simply mixed whipping cream with a little Splenda in my mixer. I refrigerated for a few hours to stiffen it up and spread on the pies.

The pies were AMAZING! The consistency was perfect, they were dense and slightly chewy, just as a pumpkin dessert should be. And, I am glad I decided on the lighter filling, as it was the perfect subtle compliment to the pumpkin.

Monday, October 15, 2007

Crunchy Noodle Salad


Tonight, I made a recipe my husband requested after watching an episode of Barefoot Contessa. I served it as a side with grilled chicken, but probably would serve it with an additional side as well next time, as it didn’t quite work as the only side dish.

I followed the recipe (link here) nearly exactly, although I did cut the oil by 1/3 of a cup. Also, I didn’t end up using all of the dressing, and even with not using all of the dressing, I still felt there was too much of it on the salad. Some other substitutions/changes: I used wheat pasta, and light soy sauce in place of the regular varieties of each of those.

Not my favorite meal, but then again I am not the biggest peanut butter fan, so perhaps that was why. With less dressing and less of the salad itself, I would probably like it better. On the other hand, my husband did love it! But, he agreed that it would be best in smaller portions.

Sunday, October 14, 2007

Vegetable and Tortellini Soup


Tonight I wandered into the kitchen wanting to make a soup, and ended up with a vegetable and tortellini soup based on what ingredients I had in the house. I didn’t necessarily keep track of what I did and how much of each ingredient I used, but I will try my best to recreate the process for you…

I started by dicing carrots and celery, and cubing fingerling potatoes. I parboiled the potatoes in a separate pot, and in the put in which I was creating the soup; I added the carrots and celery, along with a bay leaf, salt, pepper, and garlic powder. I let the carrots and celery cook for about 5 minutes before adding one box of chicken stock, followed by the potatoes. Meanwhile, I boiled water for the tortellini and cooked those according to the directions on the package. I drained and set aside. After letting the vegetables cook for a few minutes, I added 1 ½ boxes of chicken broth, as well as a little bit of water (maybe ½ cup). I brought this to a boil and then simmered for about 15 minutes. After fifteen minutes, I brought the soup back to a boil and added mini bow tie pasta to the soup. With 6 minutes left on the timer, I added a handful of pastina pasta (small little star-shaped macaroni).

Before serving, I took out the bay leaf and added fresh parsley, fresh thyme, and the tortellini, stirring to combine. I served the soup with grated asiago cheese and crusty French baguette slices.

The dish was quite tasty and satisfied my autumn desire to have some homemade soup! My husband even found that this dish really held its own, despite the omission of meat.